Our first camper, a T@G MAX, had a Zamp Solar connector. Because of this, we purchased a Zamp Solar Suitcase. We liked using it and expected our new camper to be wired for Zamp as well. However, our nüCamp T@B 400 is not wired for Zamp.
So, this became our first official modification on the 400. I wanted to use the solar suitcase, but was concerned about drilling a hole into our new camper. My husband convinced me that he could do it without creating any issues. He did a fantastic job and it works great! I am sharing his step-by-step instructions for any of you who might also want a Zamp connector.
Items Used
Zamp Connector and WireTools used
Zamp Connector with wire. We purchased the connector and 10’ of the wire for $23. You can get the connector cheaper with a very short wire, but we did not want to splice to add needed wire.
Painter’s Tape
A drill.
Drill bit for screws 1/8” Jobber Drill Bit.
Drill bit 1/4” for pilot hole.
Paddle bits: 7/8”, & 11/16”.
4 Phillips Head screws, #8 x 3”, type A point.
2 each 3/8” Lugs, 12 gauge.
Silicone, clear.
The Hole
To begin, he put painter’s tape on the drill spot to protect the finish and to mark it.
Painting tape to protect finish
The hole in our new 400 was really three holes. Firstly, he drilled a 1/4” pilot hole approximately 3/8” deep to start the hole. Secondly, he drilled a 7/8” hole that was 1/8” deep. It is for the lip of the flange. Lastly, he drilled an 11/16” hole all the way through the camper wall. This is to accommodate the bulk of the connector.
Three-stage hole for Zamp
Attaching the Zamp Port
The Zamp connector fits perfectly into the hole and the four screws attach it securely to the wall of the camper. My husband marked the spot before drilling, drilled the holes, and tightened the screws. Next, he applied silicone around the connector to seal the area from water.
Zamp Connector inserted into hole
The above wire extends to a heavy duty distribution stud that can be accessed under the bed.
Connecting to the Batteries
Next, he connected the wire to the batteries. We have two six-volt AGM batteries and the Zamp connector can access them via a heavy duty distribution stud that came installed in the camper. You may be connecting to a single battery and not using the distribution studs.
View under the bedView of battery posts
Also, my husband cut approximately 4 feet of surplus wire. He then crimped and soldered the black and red wires. He also added shrink tube to the ends.
We were a little concerned about how to attach the wire to the battery posts because of everything we have heard about reverse polarity and the Zamp. So we contacted Zamp and they explained to us that the positive wire would be coming from the male lead on the port. For our cable, it was red, so we basically just attached the red cable to the positive post and the black to the negative post.
We asked the Zamp technician what would happen if we connected it wrong. He said that it would just show an error on the charge controller. That made us feel better.
Conclusion
Finally, we gave it a trial run in our driveway and it worked beautifully. So, we now have a Zamp port on our new camper just like we had on our first camper. My husband also ordered a Zamp decal. I would have been good without the decal, but love the port.
Our new T@B 400 will be resting at a storage facility for the winter. This is a first for us because our T@G was always in our relatively warm basement. So, we will use this post as a camper storage checklist each year as we retire our camper for the winter.
Storage Checklist
1. Winterize the Fresh Water System
It is most important to ensure the camper’s fresh water system is adequately prepared for storage. If you reside in a climate that does not go below freezing, you can just drain all the water from the camper. If, however, temperatures will go below freezing, then additional steps are necessary. Additionally, we have a separate post for how we prepared our camper for freezing temperatures, Winterized our Camper Water System .
2. Have a Plan for Keeping the Battery Charged
Secondly, it is important to keep the battery charged. A charged battery can withstand sub-zero temperatures, but a drained one can be destroyed in temperatures below freezing. Therefore, it is important to keep a good charge on the battery. There several ways to address this: removal of the battery, providing a trickle charge, keeping it on shore power, or periodic charging of the battery.
Because we are storing our camper close to home, we will do periodic charging of the battery. We will store it with the battery kill switch off because it ensures there is nothing to draw energy. So, I have put reminders on my calendar to check the camper and battery every couple of weeks.
Periodic Power Monitoring
a) First, turn on the power at the battery kill switch and check the power level of the battery at the information panel.
b) If it needs a charge, connect to shore power to bring it up to a fully-charged level. Note: the power at the battery kill switch must be on to charge the battery.
c) When the battery has a full charge, disconnect the power and turn the battery kill switch back to off.
Note: when the camper is taken to storage, the battery should be fully charged.
Kill Switch is On
3. Remove All Food From the Camper
It is very important to remove food from the camper because it attracts insects and wildlife. Also, be sure to remove all canned and bottled items because they could freeze and burst. Ensure that the microwave and stove are clean so there is not anything that would produce food odors.
4. Clean the Camper
Wash the exterior and clean all the inside surfaces. Vacuum the floor and remove any stains with soapy water. If the floor is damp from cleaning, leave the windows open to allow ventilation while it dries.
5. Remove linens and all fabrics
We removed all sheets, blankets, pillows, towels, etc. We also removed our cushions and mattresses because we have read that they can sometimes be ruined by wildlife. This may be overkill, but we don’t want to take any chances of them getting damaged.
We have a visor that we will also need to spray with Kiwi Camp Dry to have it ready to repel water and make it easier to clean in our next season of camping.
5. Turn off Everything
a) Turn off the refrigerator by turning the setting to zero. Leave the refrigerator door open and put an open box of baking soda inside.
b). Make sure all lights, Alde System, range burners, television, and DVD player are off. Also, ensure that both fan switches are off.
c) Turn off the propane at the valve.
d) Turn off all power to Camper by turning the kill switch to off. (Battery image on top of switch appears upside down.)
Kill switch is off
6. Final Steps
a) Ensure that the Camper is stored in a level position and stabilizers are down.
b) Close and lock all windows. Also, close all of the shades.
c) Place the cover over the air conditioner vent.
e) Place rodent repellent in camper. We chose the one (see link next) below based on a recommendation on a Facebook group.
Rodent repellent
f) Place a moisture absorber in the camper because it will help to prevent corrosion, mold, and mildew. The product below was in stock at our local Walmart (link) in the RV section.
Moisture absorber
g) Vent the Fantastic Fan 1/4” because nüCamp recommends it in the Manual.
h) Remove trailer hitch from SUV and place in storage unit.
i) Close and lock storage unit.
Camper Storage is done!
Our Storage Environment
Our camper will be in an unheated storage unit, so we will not have to consider any type of cover for it. But, if it were outside and subject to UV rays and the elements, we would need a cover. However, it is my understanding that one should be aware of extra moisture it may cause in some climates.
I had a lot of angst about getting our camper installed in the very tight space we have, but my husband got it in with the first try. I was so impressed!
Very little room to spare
So, we have tucked our new baby away for the winter and are at home planning our next adventures.
Replacing our tiny camper was difficult for me. I had bonded with it and it was my baby! It was everything we expected it to be and served us well for two years and over 10,000 miles. We bought it at a time when we did not know if we would even like camping and it enabled us to travel for very little money to exciting, far away places. Teardrop Camping, The Decision to Buy a Teardrop.
Why Make a Change
While there are so many reasons to love the nüCamp T@G, it does have some limitations. I originally thought that the biggest challenges would be the lack of a bathroom and that it would be uncomfortable for my tall husband. We adapted pretty well without the bathroom and my husband was good with the camper most of the time because the bed was easy to access and quite comfortable. He was too tall to stand comfortably in the galley though. It would be a bigger issue, but he doesn’t do a lot of cooking.
The major reason we opted for a larger camper was to have a place to be comfortable when the weather was not good for being outside. We have camped in the rain and in extreme heat and cold. Our solution to this has always been to leave and go do something where we can be inside. Camping and Execution of the Rainy Day Plan. It beats staying in bed all day or freezing/roasting outside, but we were at a place where we would like to have more options.
Lastly, my husband has been considering replacing our tiny camper for awhile. He has enjoyed our trips, but has been lobbying for something bigger for many months.
The Replacement Camper
We thoroughly researched similar campers that were approximately twenty feet long. A quality camper with a place to be comfortable inside that also had a bathroom was the overall goal. We required at least a queen-sized bed and a separate area to relax. The brands we considered were: nüCamp, Little Guy, Alto, Airstream, Oliver, Lance, Forest River, Jayco, and Lil Snoozy. Weight, space utilization, nearness of a service location, perceived value and quality, known quality issues, comfort, value, and eye appeal were all factors in our decision.
I have to admit we were biased in favor of nüCamp. Our T@G was an incredible camper and nüCamp did a great job of customer service for us. Replacing our tiny camper with another nüCamp product seemed a safer decision. Also, we attended a rally at their Sugarcreek facility this year and were very impressed with the company and its operations.
However, if we had found another camper that met out criteria that was better suited our needs, we would have bought it instead. Some of the camper brands we have seen in person and all were researched to some extent online. My husband and I spent many hours considering specifications, options, and how we would expect to use this larger camper. In the end, we came back to the nüCamp 400.
The Search for a 400
Our desire was to buy in our home state of Alabama if possible. We were already aware of Bankston Motor Homes from its servicing of our T@G and were impressed by their performance. Bankston has multiple nearby locations and we were happy to see they had several 400s, including one Boondock Lite (BL). https://www.bankstonmotorhomes.com/
We also looked for 400s within a five hundred mile radius of our home because we had color and option preferences. It was surprising to learn that of the more than ten dealers, only a few 400s were in stock and only one of the other dealers had a Boondock Lite.
The 400s come very well-equipped with only a few options and Bankston’s 400 BL colors and options were acceptable to us, so we began the purchase process right away. David Tyler was our salesperson and we really liked working with him. He transferred the unit to the Albertville location the next day and we went to check it out. It was lovely and we told him we would take it.
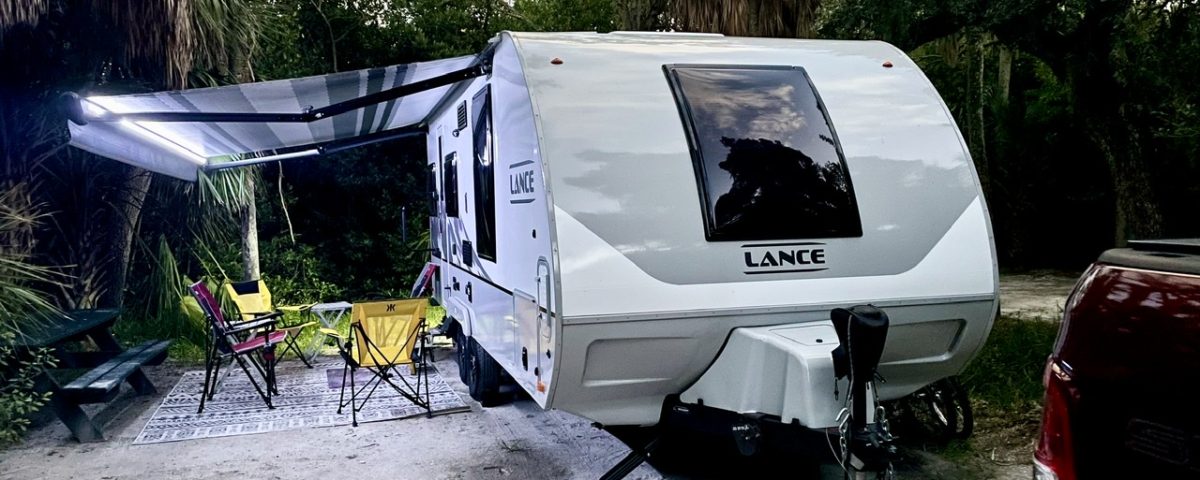
nüCamp T@B 400
There were three superficial issues that we asked them to correct prior to purchase. There was a tiny crack in the casing for the porch light, a small scratch on the lower molding of one side, and a small section of the Formica has become unglued. David assured us they would correct those items.
Upgrade Considerations
We always stored our T@G in our garage and it weighs in at just over 1,000 pounds. No electric brakes were needed and we had surplus towing capacity in our Acura MDX. However, the much larger nüCamp 400 weighs 2,690 and its GVWR is 3,500 pounds. Most noteworthy, it would not fit in our garage. Replacing our tiny camper would not be easy and we would not be able to camp so inexpensively in the new one.
Towing Capacity
Our Acura’s towing capacity had been increased to 5,000 pounds with the installation of a transmission cooling unit. The Acura’s tongue weight capacity of 500 pounds is within the 400’s tongue weight of 460 pounds, but it did not leave much surplus. We hoped it would be adequate for the new camper.
Storage Requirements
The requirement for storage was perhaps the main reason we have held back on replacing our tiny camper. It was always in our basement with easy access and no extra cost. We really hated to give up storing our camper on our property, but the 400 would not fit into our garage and we could not store it outside.
So, we began searching for storage options. We were lucky to find an indoor storage unit near our home. It is just under 20 feet deep and the door is just under 10 feet tall. Our T@B 400 BL is 18 feet long and just under 9 feet tall, so it is a fit for the unit—but just barely. It is very tricky backing it into the space, but my husband did a great job in our trial run.
Additionally, the space does not have climate control and we will have to winterize the camper. Another thing we will have to learn how to do.
The space brings with it a monthly cost of $150 and an annual cost of $1,800.
Storage Unit
Electric Brakes
Unlike out T@G, the new 400 has electric brakes, which is a legal retirement for trailers of its weight. This required us to get a brake controller for our car. We did not want to have to modify our dash and impact the wiring on our vehicle, so we opted for the Tekonsha 90250 Prodigy RF Electronic Brake Controller.
Sway and Weight Distribution
Because we do not have a lot of surplus tow capacity in our tow vehicle, we wanted something to address sway and weight distribution. We opted for the Blue Ox Sway Pro 750. It is a weight distributing hitch that provides sway control and one other nice feature. It allows backing up without adjustment, which is not available with many other manufacturers.
Blue Ox Sway Pro 750
Insurance
We were careful to add the 400 to our insurance before we took it on the road because it was a sizable purchase. State Farm insures our camper and because of the higher cost of the camper, our camper insurance cost moved from $200 to $417 (with a $ 1,000 deductible).
Decreased Gas Mileage
We were able to tow our T@G and get an average of 18 miles per gallon. There has not been a chance to check the gas mileage on the new unit, but we expect it to be around 12-13 miles per gallon. If this is the case, we will have to spend approximately 50% more for gasoline. This increase can be pretty significant on long trips.
Fixed Annual Cost Summary
Accountant that I am, it was necessary for me to consider all the financial ramifications of replacing our tiny camper. Beyond the purchase, we will incur approximately $2,000 per year in storage and additional insurance, plus 50% higher gasoline costs. Is it worth it? At this point in our life, we think it is.
Replacing Our Tiny Camper
It all happened rather quickly and we were ready to pick up our new baby. David Tyler and Bankston RV were amazing and we are very happy with our new camper. Some of the service team even came in on a Saturday for us. I can’t say enough nice things about them.
Our New Camper at Bankston RV with David Tyler
With the T@B 400, we are gaining the sitting/eating/sleeping area below. This space, plus the indoor kitchen for when the weather is bad, was our main motivation for replacing our tiny camper. The area has three setup options . Below it is set as a seating area, but rearrangement of the pillows allows it be used as an extra bed. Lastly, if the center cushion is removed, the table can be lifted to create a table with seating on two sides.
Seating and Eating Area
This lovely indoor kitchen is a definite perk. It will be wonderful on those cold mornings.
Indoor Kitchen
There is also the benefit of having this tiny bathroom. No more middle of the night hikes to campground bathhouses. We expect this to be a convenience we will really appreciate.
Wet Bath
However, the new bed is slightly smaller than a queen and only accessible from one side. The T@G has a king-sized bed with a door on each side. I am afraid we are going to sorely miss our old bed. Also, for the record, the bed is a bear to make!
Queen Bed (almost)
We are happy overall with the T@B 400 amenities. Replacing our tiny camper is completed and we are excited about taking this new teardrop to far away places!
A Final Change
On our ride home with the new camper, all went well, but my husband said that the front end of the car felt light to him and the steering wheel was too easy to turn. This concerned us! We should have been under the 500 lb tongue weight, but the new weight distribution sway bar hitch was quite heavy. It turns out that it weighed 47 pounds, which was 7 lbs over our car’s tongue weight limit. I worried that this would damage the car over time.
We were prepared to replace our tow vehicle if needed and that is what we did. So, we now have a giant SUV that can pull 9,000 pounds with lots of tongue weight to spare. It should be great for camping, but sure will be big for me to park. Intimidating!
So, replacing our tiny camper led to replacing our tow vehicle as well and we have much to learn about both with a camping trip fast approaching.
We are brand new to solar panels and I must say, we do not have them totally figured out yet. I am an “instructions gal” and usually can make sense of things by reading the instructions. However, in the case of solar panels, much of it may as well be in a foreign language.
I would love to read a post entitled “Solar Panels for Dummies”, but have not yet seen one for camper batteries. So I am trying to learn enough to provide some basic language on the subject.
Why Solar Panels
It seems that most of the National Parks sites do not have electrical hookups. Also, I am aware there are great places out west to boondock. While we would love the camp in some of those places, we do like a few of the comforts that electricity provides.
We considered a generator, but they are not allowed at some campgrounds and the idea of hauling one around plus the fuel was not very appealing. They can also be noisy. We may eventually purchase a generator, but I want to fully understand solar first to see if it can meet our needs.
Our Equipment
A little background first: we have a T@G MAX XL teardrop with the Norcold cooler. (From reading posts on Facebook groups, I learned that the cooler really draws the amps.) We knew that the Norcold could be an issue, but wanted to see firsthand how it would work. So, we treated this first use as a learning experiment.
Some Basic Information
Amp Hour (Ah)
An Ampere (Amp) is a measure of the amount of energy stored in a battery.
A battery with a capacity of one amp could supply a current of one amp for one hour or two amps for 1/2 hour or 1/3 amp for three hours before becoming fully discharged.
A battery with 100 Ah would produce 5 amps over 20 hours, but if discharged at a high rate like 50 amps in an hour, it would only last one hour because of the high rate of discharge.
Converting Watts to Amps/Amps to Watts
Watts = Amps x Voltage (12 If a 12 Volt Battery)
Amps = Watts / Voltage (12 If a 12 volt battery)
The Solar Panels
We purchased Zamp 80P solar panels and used them for the first time on a recent trip that ended in a National Park in Kentucky. Zamp was chosen because the camper was already wired for it, they appear to be of high quality, and are 100% waterproof.
Zamp Solar Panels in case
The photo below shows what the inside looks like when opened. Inside is the controller, cord, and fold-out adjustable legs. It also comes with an adapter to hook directly to a 12 volt battery, but we did not need it.
Zamp 80P Solar Panels
The Charging Environment
We had a one night stay in Michigan’s Upper Peninsula and hooked up the panels, but we arrived late and left early the next day. It was cooler there and the Norcold cooler did not have to run as much. It was too short a time to really make an assessment.
The last two days of our trip was in Kentucky at Mammoth Cave Campground with no electricity. We had a shaded site, but there was quite a bit of sun on the asphalt pull through. We did not have an extension cord, but I can see the valve of having one in the future. However, by moving the panels as the sun moved, we were able to get as high as 4.0 amps for part of the day.
It was Kentucky in the late summer, so it was predictably hot—low nineties in the day and low seventies at night. The heat worsened the issues we had with the solar panels and the Norcold. Cooler weather might have made a big difference.
Preserving the Battery
The 12 volt battery can be destroyed if allowed to go too low. So, it is not a bad idea to have a voltage meter to monitor activity. This link is for an inexpensive one that can be ordered from Walmart. It plugs directly into the 12 volt receptacle on the inside and also the back of our T@G. The solar panel controller also monitors battery voltage.
The table below shows the voltage and related state of charge for a 12 volt battery. The battery should stay in the green zone to provide the longest life. The Zamp controller will show the battery in a warning state if it dips below 12.5 volts.
Voltage and State of Charge
Set-Up
The Zamp instructions stated that you must have the correct battery type indicated on the controller or you could damage your battery. My husband tells me that ours is a wet battery and AGM is the default, so I had to change it. The lower black button on the right on the controller changes the battery type. Once you change the type, it retains the information.
Setting up the panels is very easy. First, open the panels and pull out the legs. Next, position the panels so they are directly facing the sun. Then, plug the cord directly into the external receptacle on the driver’s side of the case that holds the battery and propane. You must press it in firmly. (See photo below). You are now ready to go. As soon as the cord is plugged into the receptacle during daylight, the panels will begin working and the controller will begin displaying data.
Connecting to the batteryCord plugged into camper receptacle
The Data
The controller has three lights that provide information about the charging status and three lights that reflect the condition of the battery.
In the photo below, charging is occurring (red light) and is providing a charge to the battery (blue light), and the battery voltage is above 12.5 volts (green light). This is how the controller looked most of the time we were using the solar panels.
Zamp Controller
Below is a table from the manual that explains how to interpret what the lights mean that are on the controller.
Controller Table of Information
Red Charging Status: When receiving sunlight, the light is always red, however the light will flash when the solar panel is weak. It is unlit if it is dark and there is no charging occurring.
Blue Charging Indicator: This light is on when the battery is being charged.
Green Float Charge Indicator: This light indicates that float charging is occurring. It would mean that battery is fully charged and is being maintained at a safe level. A wet battery is fully charged at 13.6 volts. This light did not come on while we were using the panels.
Battery Condition Green: Battery is above 12.5 Volts (+-0.2V). For most of the time we were using our solar panels, this light was on.
Battery Condition Yellow: Battery is below 12.5 Volts and above 11.5 Volts (+-0.02V). We saw the yellow light several times when the Norcold cooler was running.
Battery Condition Red: Battery is below 11.5 Volts (+-0.02V). Thankfully, we did not see this light on during our usage of the panels.
Amp/Volt Button: Pressing this button toggles between displaying the current battery voltage, the charging current, and charged capacity (Amp-hour).
Results on this Trip
On our first night, we only had a few hours of limited sunlight. When the sunlight was greatly reduced and the Norcold was running, the yellow light came on. We feared we would damage our battery if we ran the cooler or used the fan, so we turned off the power from the battery.
The next day, we had many hours of sunlight and were obtaining as much as 4 amps and I was hopeful we could run the fan that night. We ran the Norcold all day, charged our electronics, and played music on the DVD using Bluetooth and music on my phone. A couple of times in the hotter part of the day, the yellow battery light came on, but when the Norcold stopped running, the battery light would eventually move to green.
Monitoring the solar panels
However, when the sun was down, the battery light stayed yellow and there was no charge occurring. Also, an (E) light was showing on the Norcold. This appears to be a safety measure. We felt our only choice was to turn off the power so we endured another hot night without the fan.
Load Analysis
As we clearly have issues trying to run the items we planned, a reader suggested that a load analysis would be helpful. Below are the 12 Volt items in our camper and the amount of energy each uses in an hour. There is also a column estimating the number of hours in a day they would be used and a projected daily total.
Because there are some solar options like solar power generators, I added a chart for items that we use when camping that run on 110. We are a long way from such a solution, but I like knowing how much energy the items draw.
Camper Load Analysis
It is clear from reviewing the 12 volt list that the Norcold is a major energy hog, claiming an estimated 43% of the total daily energy. Converter amps would also be significantly lower without the Norcol, saving perhaps 8 amps. If we use an ice chest instead of the Norcol, our estimated daily amps goes down to approximately 37. This is a much more reasonable number, considering our current equipment.
Increasing Energy Capacity
There are several ways to increase energy capacity if not happy with amount of power the solar panels provide.
Increase battery capacity. Our battery only provides only 65 amps, but the same brand produces a similar battery with 105 amps. This would be a significant improvement over the current battery. (The battery does weigh a little more than the current one.)
Change battery configuration to two 6 V batteries. This works much better than 12 V for dry camping. The 6 V’s have 600-700 life cycles as compared to the 12 V’s 100-150. Amps would be ample at 180 or up to 220 amp hours per battery. However, they are they are more expensive and it is likely modifications would be needed to make the two batteries fit in an existing camper. They are taller than 12 V batteries, but have a similar footprint. (A reader of this post stated they had great results using two 6 V batteries.)
Purchase higher solar panel wattage. Our panels are 80 watts and can produce a max of 4.6 amps per hour. This is not a lot of capacity if sunshine is limited.
Purchase a portable solar power generator. This is a pricey option, but it enables the use of 110 items and also it would be a good item to have at home during power outages. They are cleaner and safer than a generator. (I think I want one!). Two brands appear to be dominant in the market, the Inergy Kodiak and the Gold Zero Lithium Yeti System. Each can charge with solar panels or a wall outlet. A good comparison of the two systems can be found on YouTube.
Lessons Learned
While the solar panels did not provide adequate charging for our needs on this trip, I feel we can take what we have learned and make some changes for future success. We will make the following changes next time we are dry camping.
Substitute a high-quality cooler for the Norcold. We were fighting a losing battle trying to use the Norcold in ninety-degree weather. The Norcold might work with the panels in a much cooler environment, but we will not be expecting to use it when dry camping in the future.
Purchase an extension cord for the panels. It is clear that it would be handy in some situations.
(Perhaps) purchase a portable solar power generator.
I look forward to another opportunity to use the solar panels and will update this post on our resources page with any new information.
The second üCamp rally was held in July 2018 in Sugarcreek, Ohio, at Winklepleck Grove Campground. Approximately 160 sites were filled with tiny trailers from all over the United States and Canada. The largest number of campers represented was the T@B 320, but there were also at least twenty each T@B 400s and T@Gs. We own a T@G MAX XL and were excited to see so many other tiny campers.
Site 1B, Winklepeck Grove Campground
Winklepeck Grove Campground
Winklepeck is a primitive campground in a large shady grove. It is beautiful, but does not have flush toilets or showers. However, nüCamp brought in two shower trailers and a large number of VIP portable toilets. The portable toilets were okay until the last day before they pumped them. So we were going into town and using the public restrooms near the fire station on that day.
The campground split the electricity among two campers for each site and it split the water as well. However, we had all that we needed, including running the air conditioner and microwave.
Winklepeck Grove Campground
Rally Activities
There were many fun things to do during the rally, but it seemed that everyone’s favorite was to walk the campground and meet fellow nüCamp trailer owners. Also, it was cool to talk with those who had the same size camper and see their modifications and how they were using theirs. Lastly, it was nice to see the larger models and maybe even consider an upgrade.
Several meals were provided, plus great entertainment the last night featuring two local sisters called Kodachrome Babies. They were very good and sang some amazing oldies.
Rally ScheduleSome meals and events under the big tentWine and cheese night
Factory Tour
The highlight of the trip was the tour of the factory so we could see how these tiny trailers are made.
nüCamp Factory
The factory is in the heart of Amish country and many of the employees are Amish. The quality of the work is evident and well-recognized within the industry.
Amish Buggies at the last night’s dinnerScott Hubble, nüCamp CEOAssembly line for T@GsReady for Delivery
We were on the second tour. Scott Hubble, the CEO, gave a presentation at the beginning of the tour about the history of the company and its current initiatives. He then answered questions. After his presentation, he turned everyone loose to explore the facility. Our friends told us that Joe Mullet, the founder and President of the company, gave the first tour. They said he shared about his personal struggles at the beginning of the company.
The factory was immaculate and seemed very well organized. We left with an even stronger impression that this organization really cares about its customers and making a quality product.
Conclusion
In my opinion, üCamp 18 was a huge success. It was a well-organized and a thoroughly enjoyable event. We were sad to leave this wonderful gathering of tiny camper owners. Many had commented to us that this trip was the highlight of their year and I would have to agree.
Sunset at Winklepeck
Mandy Lea is a well-known photographer who has lived in several nüCamp trailers and has produced YouTube videos about them. She presented the large panoramic picture below to the Company’s leadership on the last night and had some beautiful things to say about them.
Mandy Lea’s gift to nüCamp
So we loved üCamp 18 and hope to be there again next year! If you would like to follow us, here is a link.
A bathroom was on our list of “must haves” for a camper. We ultimately purchased the NuCamp T@G for many good reasons, but having no toilet required a major adaptation on my part.
Purchase of Camper with No Toilet
I am a newly-retired, former accounting professional, newbie camper who has never been particularly outdoorsy. We wanted to give camping a try, but did not initially consider campers with no toilets. I felt that having no toilet was just too much sacrifice. However, we settled on our T@G, which has no toilet. We chose it because it fits in our basement and is easily pulled by our tow vehicle.
For some readers, this post may be TMI, but I would have liked to have read something like this when we first considered our camper and in the early days of our camping.
The biggest challenge for me would be to adapt to very uncertain and varied bathroom options. I was not worried about showering at campsites, but I was worried about how I would handle getting up in the middle of the night, which happens often.
We have been on nine camping trips to ten different campsites and I can honestly say that I am far more comfortable with camping in our T@G, but it has been a process.
Worst Nightime Experience
This occurred on our first camping trip. On the first night, I had a flashlight handy and had checked out the bathhouse location in the daylight, so felt I was as ready as I could be for my nocturnal trip. The bathhouse was down a trail with a couple of turns. It was well-lit, so I had no trouble finding it. Coming back, I took a wrong turn and ended up in a different area. I could have wandered around for quite awhile, but recognized one of our friend’s campers, which helped me navigate to ours.
The next night I used a five-gallon bucket filled with kitty litter and topped with a toilet lid. (This was our very low-tech solution.) It was in a tent on our campsite and was far better than hiking in the woods. Despite the convenience, I did not like the cleanup.
New Strategy—Camp Near a Restroom
This strategy actually worked very well! Compared to hiking through the woods, walking a short distance to a bathhouse you could see from your campsite was easy. I stayed with this strategy through several camping trips and will use it again whenever it is a good option.
It was not a good option on a trip with a group of our friends. We booked our sites early and they had prime spots. I chose not to stay in their area because it was not near a restroom. Our area was not as shady as theirs, had far more bugs, and we were not able to be where the action was with them. This got me to thinking another option was needed.
Next Strategy—A Porta Potty
A friend had been suggesting that I get a porta potty since we began camping, but I had been resisting. Concerned that dealing with cleanup would be gross, but ready to give it a try, I bought one on line. Also, having discovered that we did not always have the option to set up a tent, we bought a privacy tent.
I was also a little bit intimidated about how they worked. However, I will go into some detail here for those who may be unfamiliar with them. The one we purchased seems pretty standard. There is a top section where water is stored for flushing and a bottom section for waste. We also use holding tank deodorant and it works very well; there is no unpleasant smell.
Disassembled Porta Potty
Our Setup
The photo above shows the potty we purchased disassembled. Upon arrival at campsite you just fill the section on the right with water and the attach it to the section on the left. Then toss in one of the deodorant packs into the bottom section. When utilizing it, you pull out the lever on the bottom and when finished, you press the waffle valve on the top to flush. You then close the lever on the bottom.
Cleanup was not bad at all. My husband volunteered to handle it, but as I am the primary user, I felt I should do it. It was far easier to use and clean than I feared. The assembled product is below.
Assembled Porta Potty
This gave me such flexibility! I no longer worried about being near the restrooms. We always brought the new equipment when we were uncertain about the closeness of campsite facilities, though sometimes we did not take it out of the box. We could camp at the best sites with our friends. Our little privacy tent goes up and down very easily and we were set.
Privacy tent/toilet
You would think that with our new equipment and my adaptation to using them that having a camper with no toilet would be a non-issue. However, we have encountered one other situation that is not resolved. Here is a link to a tent identical to the one we purchased.
The No Tents Dilemma
We recently camped with friends at a beautiful RV Resort. Upon arrival, we learned that no tents were allowed, not even a privacy tent. I raised it a couple of times with management and they were not budging. We were not near a restroom, but we were only there a couple of nights. We were with friends and I decided to just make the best of it. It was a pretty far hike for the middle of the night, but it was well-lit and easy to navigate. Fortunately, my previous trips trekking to restrooms has made me flexible about nightime walks.
Summary
The fact that our camper has no toilet is no longer a big deal. I could not have said this at the beginning of this journey. We love our T@G and the economy it brings to our camping trips. For those who are first considering camping with no toilet, I offer the following recommendations:
Be open to new experiences. If you want to adapt, I believe you can. Also, this is camping, not luxury travel. It has its own kind of special beauty, but it is not primarily about the comfort.
Remember that you are getting a lot on the plus side with a teardrop. Light, easy towing and the ability to conveniently store in your garage. That was worth a lot to us.
Always look for the close restroom option when it works for you. No bathroom to clean at all; how cool is that?
Don’t wait to get a porta potty. They are easy to set up, use, and break down.
When booking campsites, always get a clear understanding of any restrictions related to tents. I suspect this would be primarily related to RV resorts. You may want to go anyway, but it is a good idea to know what to expect.
Enjoy your camper and embrace new adventures!
We now have a camping resources page for new campers. You might want to check it out.
Our first camping trip was with seasoned campers, and after it, we felt ready to try it alone. Even though it was getting a little cold for camping, we wanted one more trip for 2016. We only had three days, so could not go far. We decided to try Gulf State Park in Gulf Shores, Alabama. I called to make the reservation and they were able to provide a camping spot on the water and near a bathhouse. Arriving just before dark, we set up quickly. We brought along an EZ 10X10 tent and stored our table and food bins under it as there was a very slight chance of rain.
That First Night
No cooking was required that first night because we stopped along the way. We did not do anything special, just listened to music and talked till sleepy. Sleeping was wonderful in the LG. We have learned that it is important to keep the cabin ventilated, so we kept the fan vent on the top open. It was not cold at all under the covers, even though the temperature went down to the mid-forties!
A Windy Camping Day
We awoke the next morning to the wind howling and when I checked, winds were at 19-20 MPH. We quickly took down the EZ tent as we were afraid it would blow away and perhaps do some serious damage. It is quite heavy and though we had it staked, it did not seem adequate. We were down to just our LG on our campsite. It was a few days before Thanksgiving and the campground was filled with many large RVs. Next to them, our little spot looked barely populated.
A Beautiful View
We had a fantastic view! We were there for two full days and three nights and each day was filled with abundant sunshine and deep blue skies. Again, we had chosen a time with a cold front. While we were there, it became colder and after we left, it became warmer. At least no rain though! Below are some photos taken from our campsite.
View from Site 245
Excellent Raw Oysters
The first day, we had a very simple breakfast of instant oatmeal and then went exploring the area. The park is very nice and there are many trails and sites to see. We had lunch at the Oyster House in Gulf Shores. I have always been a fan of raw oysters, but these were perhaps the best I have ever had. Two factors, I think, contributed to this: the cold weather and the nearness to the source. These had to be very fresh and they were large.
Oyster House Raw Oysters
More About the Park
A nice pier and beach access is provided by the park. There is also an outdoor swimming pool. This will be a good place to take grandchildren later. We visited the pier and walked on the beach. A few seagulls posed for some photos. If you are into fishing, this seems to be a good place to go as well, however, according to some fishermen we met, they were not biting on the day we were there.
We went shopping in Gulf Shores that evening and saw the movie, Hacksaw Ridge. It was a great movie! When we arrived back at the campsite it was getting quite cold, so we pulled out our new electric blanket.
Hanging Out at the Gulf State Park PierSeagulls Posing for PhotographBeach beside Gulf States Park Pier
Easy Like Sunday Morning
It was very cold outside when we awoke the next morning. I believe it went into the mid-thirties the night before. The idea of preparing any kind of breakfast in that cold was very unappealing, so we went out for breakfast at Another Broken Egg in Orange Beach. It was a first for us and we really enjoyed it. By the time we returned to the campsite, it was much warmer and the winds were calmer. We went to a small Sunday service at the Education Center with some people we had met the day before. After that, we rented bikes. There are many trails in the park and we had a great time! Much of the trails were paved and shaded with beautiful trees and Spanish moss.
Enjoying the ViewGulf States Park Biking and Hiking Trail
Evenings Camping at the Park
We planned to cook some spicy sausage on the grill that night and went to the nearby Walmart for charcoal. However, we were lured by Auntie Annie’s pretzels located within Walmart, and that killed our appetite. Consequently, there was practically no cooking on this trip. We sat outside for a couple of hours with our new electric blanket over us. It was not enough! However, for sleeping inside the LG, it did a great job. All three nights at Gulf State were great sleeping for us–no cold and no discomfort.
Our Puppy Wakeup Call
We awoke the final morning to a Lab puppy whimpering just outside our door. He had gotten loose and wanted in our LG. Greg could not get out because of this. Eventually, he crawled over me to get out on my side to avoid the puppy jumping into our cabin. The puppy was very friendly and followed Greg to the bathhouse. Greg found a tag with a phone number on him and called the owner, who was frantic to find him and came to get him right away. He was very grateful and had been looking for him since daylight.
On Gulf State’s Bike Trail
Camping Lessons Learned
1) Buy high-quality water hoses and fittings. Our cheap hose leaked and we had to find a hardware store to be able to hook up to the water without leaks.
2) Alligators are not a likely to come into your camp if you are near a lake in November. This may seem silly, but the website stated to beware of alligators and I was a little concerned about getting up in the middle of the night with an alligator nearby. A ranger told me that it is very rare for them to get out of the water and they are not very active when it is cold.
3) It’s not so bad to not have a toilet in your camper if you are near a bathhouse.
4) Lastly, and more importantly, we can go away camping for several days and totally enjoy each other’s company. Our first trip was with friends, which was great fun and helped to keep us entertained. We now know that it can be great fun for just the two of us as well!
We were so excited to be going on our first camping trip in our new teardrop. Our friends, who were experienced campers, made it easier and so much fun!
First Camping Trip
Our first camping trip was more than a month after we bought our Little Guy (LG). While we were waiting, we acquired camping accessories. Our son has done a lot of tent camping and he gave us some gear, including a ceramic heater. So, we thought we were good to go. However, the day before our trip, it occurred to me that if we wanted to use the cable service at the campground, we might want to get a coax cable. I called a friend to ask how that worked along with several more very basic questions about protocols at campgrounds. She probably thought some of my questions were silly, but remember, we are very, very inexperienced in camping.
The Campground
Our first camping trip was to DeSoto State Park in Fort Payne, Alabama. We were with four other couples and a single camper. They were all experienced campers and very helpful. We learned right away that we had neglected to bring a water hose, but a friend loaned us one. As we were staying for a couple of days at the site, we took a tent to expand our living space. It went up rather quickly and we were set. Below is a photo of our campsite. It was mid-October and the weather had turned much colder, with lows in the mid-thirties the weekend of our trip. We set up the tent with a table, our gear, and that glorious heater. It did an amazing job in making the tent very comfortable.
There were no other teardrops at the campground on this first camping trip. All were motor homes or full-sized travel trailers except for one pop-up camper. Our friends all had very nice accommodations. There were three motor homes and two good-sized travel trailers. I must say, after going around to check out all their campsites, I had a little camper envy. All had full baths, closets, headroom and space for entertaining. While they all were lovely, I still am glad that we have our Little Guy because of the many reasons outlined in my first blog. We just have to make some adjustments.
How Did the Big Guy Fit into Tiny Trailer?
I am going to show you something I could not find while we were shopping and considering our LG. We searched all over the Internet for comments or pictures showing anyone tall in a teardrop. My husband, Greg, is 6’3″ and the photo below shows him in our LG.
My big guy in our teardrop
We used all of the LG’s functionality except the air conditioner on our trip. We stored the makings for hot dogs in our ice chest, cooked them on the stove, and washed the dishes in the sink. All performed beautifully! The cable television came in well and my husband watched part of the Auburn game. It was very comfortable. We had a couple of those pillows shaped like the back of a chair to lean upon, which made it more comfortable for just hanging out.
Watching the game
First Camping Trip, Cooking and Eating
Our first night, we had a potluck at a double campsite of our friends. We ate outside on the picnic tables. This was a site with two motor homes. They had cute lighting outside and the football game going in the background. It was very festive and lots of fun! I brought Mexican cornbread made at home, so there was no cooking for us.
Our first cooking at our campsite was for breakfast. We had the same thing both mornings: English muffins with egg, sausage, and cheese. The sausage was cooked in a skillet on the stove and the eggs in the microwave. We purchased an inexpensive two-slice toaster for our camper; it and the coffee maker were on the counter. It got crowded in a hurry. Next time, I think a small table set up near would be a good strategy for the toaster and coffee maker. We cooked our hot dogs the second night and we met at the same campsite as the night before to eat together. However, there were fewer of us because some had gone into Mentone, a nearby town for dinner. We ate inside one of the large motor homes and it had all the comforts of home.
The Galley
You can see the galley in the photo above. It has an electric ice chest, two-burner stove, microwave, sink and some limited counter space. We cooked at the galley and had our breakfast and coffee in our tent. It was so nice to have a place to sit and eat that was warm. The tent was also a good place to change clothes and to store our dishes and food.
Inside the tent
The Other Teardrop Issue
Other than being able to be comfortable in the LG, my big concern was its lack of a toilet. This was my first real-world reality check with that issue. We were about 400 feet from the bathhouse and the path was through a wooded area with three forks in the path. I made the trek during daylight a couple of times. It was easy to see the way to get there day and night because the bath house was big and well lit. However, even in daylight, I took a wrong turn once on the trip back. I am not generally an incompetent person, but have a terrible sense of direction.
Knowing I would have to get up in the middle of the night, I prepared as best I could. I had my flip flops on a shelf at the foot of the bed and a flashlight in the corner of the head of the bed. No problem getting there. It was cold, but not miserable. Also, I was moving, which helps me stay warm. I tried to pay attention on the trip back–but again–wrong turn! I came out in an area where all were big campers. Fortunately, I recognized campers belonging to our friends so I knew which way to turn. I made it back to the LG with no further issues.
If this is Likely Again
However, this got me to thinking about future camping trips. I have looked at some campsites on line that are quite large and are not laid out in a predictable manner. A few wrong turns could create exhausting wandering. That would not make me happy! I think I might have something that will help with that. There is an app called “Find My Car”. For me, it could be, “Find my Bed”. I would not need it in all circumstances, but if we stay in a larger, more complex campsite, I think I will use the app.
I know that there are options with portable toilets and those will be considerations as well, but I plan to take the bath house option most of the time.
Going Forward
Our first camping trip was truly amazing! We also expect to take a couple of short trips in the November-December timeframe and will be taking a long trip in February, which I know is going to be an adventure. So far, this has been great fun! If you would like to follow our progress, this is a link to our main page.